Showing posts with label 2013. Show all posts

Friday, October 4, 2013

MUA Fur-effect Nails

I've tried Magnetic nails, Flakies, Kaleidoscope nails and the ever so famous Caviar nails. So now, let's see how fur feels like on my tips!


Since I'm just test driving this out for the first time, I didn't want to put it on my nails entirely so I used it as an accent.


The furs looked great as it is but I felt a bit more creative so I added stones and a few pieces of caviar beads --now that's what you call effort! Haha!


If you wanna get your own fur nails, just visit www.beautycornerph.com and see what you like from all 5 equally posh shades!


So what do you think of my design? Let me know what you think on the comment box ⬇


Post not sponsored.


Tuesday, September 24, 2013

Zooey's Emmy Nails

You can always rely on Zooey Deschanel to do the quirkiest things on the classiest Hollywood events. On the last year's Golden Globes, she did a funky Tuxedo design on her tips.


 Earlier this year, she wore this Film Strip design.


And at the recently held Emmy's, she showed up again with yet another quirky set of tips. And I won't let it pass without recreating it!


What do you think? Was I close? Show me yours too! Paste the link on the comment box ⬇


Sunday, April 28, 2013

OOTD: 04-28-13

What I love the most about summer is that you can use it as an excuse to wear the cutest outfit you got. Last March I did a little shopping on the SuperSale Bazaar and focused solely on hand picking my summer get ups. And this is the first outfit I came up with. What do you think? 


♥ ♥ ♥


♥ ♥ ♥


♥ ♥ ♥


Saturday, April 6, 2013

FOTD: 04/06/13

I've always loved combining warm and bright hues. So far, this one's the most wearable of all the combinations I've done. The pics did not do justice for the look at all! Maybe I should put on the colors a wee bit heavier the next time around so it would register much better on cam. Anyway, tell me what you think on the comments section. Keep scrolling for the list of products I used for today's look.


Products Used:


Ben Nye Banana Luxury Powder
Clinique Blushes (New Clover)
Sleek i-Divine Palette (Storm & Snapshots)
Etude House 'Drawing' Eyebrow Pencil
ELF Brow Tame
Covergirl Lashblast
Shu Uemura Eyelash Curler
EOS Lipbalm (Strawberry Sorbet)
Ever Bilena Matte Lipstick (Dusk)


Wednesday, April 3, 2013

Sonas Denim: Not just your ordinary Blue Jeans


Everyone owns at least a pair of jeans. But not everyone owns a pair of "Patch pants" -well, not yet. But soon enough, a brand called Sonas Denim will take over our dressers.


©Sonas Denim


Sonas Denim was started in San Francisco by a man named Gerry Kelly on 2001 when he was faced with a major fashion disaster: his go-to party pants fell completely apart during a really big event. Determined to make another 'one of a kind' pair, Gerry decided to gather up some old denim pieces and patch them up together. His new creation has become a huge hit in parties and later on gave Gerry an idea to start Sonas Denim.


©SonasDenim

©Sonas Denim


The so-called "Patch pants" is now starting to get the hype it truly deserves as some Hollywood celebrities were spotted rocking it. These celebs include The Walking Dead's Laurie Holden, Sofia Milos of CSI Miami, Romi Klinger of The Real L Word, as well as Janice Dickinson.


©Sonas Denim

©Sonas Denim
©Sonas Denim

©Sonas Denim

I don't know about you, but I sure am crazy about these pants!
 Go to the Sonas Denim website now to know how you can score yourself a lovely pair.


Thursday, March 28, 2013

Face of the Day: 03/28/13

It's all about looking girly girl today with my rosy cheeks and pink lips. Of course I can't miss doing bold eyebrows. And the ultimate girly girl look trick? Long, curled and uber flirty lashes. Keep scrolling to see the list of the products I've used for today. Toodles!


Products Used:

Ben Nye Banana Luxury Powder
Clinique Blusher (New Clover)
Shu Uemura Eyelash Curler
Browlash Water Strong Eyebrow Pen &Pencil
Sleek Lash Out Mascara
Milani Liquif'eye Eyeliner Pencil (Black)
Nyx Lip Liner (Nude Pink)
Ever Bilena Matte Lipstick (Pink Flame)


Tuesday, March 19, 2013

Face of the Day: 03/18/13

I'm a sucker for thick and perfectly shaped eyebrows. I can simply ditch all the steps in my make up routine except for the brows. My natural brows are thick by shape but the strands itself are sparse so I always feel like I need to fill it up. And doing so really makes a big difference.


Products used: 
  • Ben Nye Banana Luxury Powder
  • Etude House 'Drawing' Eyebrow Pencil
  • CoverGirl LashBlast Volume (for upper lashes)
  • Maybelline The Magnum Volum Express (for lower lashes)
  • Shu Uemura Eyelash Curler (not in photo)
  • Sleek i-Divine Palette in Storm (for contouring and highlighting)
  • The Face Shop 'My Lips Eat Cherry' Aqua Tint


Friday, March 1, 2013

J&C Super Clean Solutions Brush Cleaner

Are you having break outs but absolutely have no idea what could be the reason? It must be because of your make up brushes. Most girls tend to overlook their brushes, while some are just too lazy to clean theirs every single day. So allow me share you this amazing discovery that I had this month.


Spray the product against your brush a couple of times, wipe it using a cloth or a tissue paper and it will be ready for another round of make over. There's absolutely no need for rinsing and hours of drying!


Purchased from: Digital Traincase


Thursday, January 24, 2013

REVIEW: Ben Nye Banana Visage Poudre - Luxury Powder

I don't care so much about finishing/setting powders since the one I was using worked pretty fine (Lewis & Pearl). But when I read somewhere in the web that Kim Kardashian's MUA swears by this particular powder, I felt that I had to get hold of it immediately. 


It comes in 3 sizes: 1.5 oz., 3oz. and 8 oz. And since I'm just trying it for the first time, I decided to get the smallest one which promises around 35-100 applications per ounce.


HITS:

  • sets your foundation and concealer wonderfully.
  • it does a good job on lightening the under eye area.
  • it's also perfect for highlighting the high parts of the face like the cheekbones, bridge of the nose, chin etc. 
  • it helps cover up visible pores. 
  • it does not cake.
  • it will keep you shine free all day!
  • it contains a lot of product so it will last you a really long time.
  • it looks great in photos.
  • it's really affordable, considering how much product you get.

MISSES:
  • packaging's too bulky.
  • the cap is too small to fit your face brush into.


Purchased from: The Style Quarter


This post is not sponsored.

Sunday, January 20, 2013

REVIEW: Ever Bilena Matte Lipstick Collection Complete Shades + Swatches


I'm not a lipstick person but since I've heard so many beauty bloggers rave about this particular product, I figured I'd try it for myself. 


It comes in 14 shades. The colours are pretty basic, the types of shades that someone would use for an everyday look for the office or school. There are lots of nudes, a few pinks, deep reds, and even oranges, which I believe are the newest shades. My personal favourite is Dusk (see the swatches below).


HITS:
  • the staying power is amazing, especially if you use a lip liner with it. You'd have to re-apply after eating, but then again, I've never tried a lipstick that does not require me to do just that!
  • the packaging looks very classy and it's very sturdy as well. I dropped a few of mine several times and it's still pretty intact and still looks good as new, unless you drop it without the cap on, that will probably leave a huge mess!
  • every shade is pigmented, including the nude ones.
  • I like that they provided a colour cap so it's easier to find whatever shade you want to grab.
  • it's very cheap. Each tube costs only Php155 at Watson's.

MISSES:

  • it does not glide on smoothly when used alone. But I don't really mind, since I always use lip balm as a base anyway.
  • the lipstick itself tends to melt. It's probably not a good idea to leave them somewhere hot. 
  • it does not have any scent. This belongs to 'misses' because I'm actually a sucker for scented lip products, like EOS Lip balm.


SWATCHES:


Click to enlarge
Click to enlarge
Click to enlarge
Click to enlarge


This post is not sponsored.

It's raining discounts over at Multiply!

Good news my co-online shopping fanatics! Multiply Philippines is offering a whole bunch of discounts once again! So if you have any more pending items on your cart, it might just be the perfect time to finally checkout!

© Shop at Multiply 


Here are a list of some of the coupon codes you can use for Beauty and Fashion items:

M-PHFREESHIP2011
Get free shipping once you get products worth Php400 and above.

PH-TWENTYOFF 
Get 20% off your total, with no price limit. Exclusively for make-up items only.

PH-CHECKOUT
Slash off Php250 when you get Php500 worth of items.

MEMEME500OFF
Get a minimum of Php2000 worth of MeMeMe products and slash Php500 off your total. 


This discount frenzy only lasts for a limited time only, so watcha waiting for? Go ahead and get that top you've been eyeing before now!
PS: The codes listed above are effective for Multiply's Trusted stores only.


For more information, visit Shop at Multiply 

If you're new to online shopping, score some useful tips on shopping for cosmetics here


This post is not sponsored.

Sunday, January 13, 2013

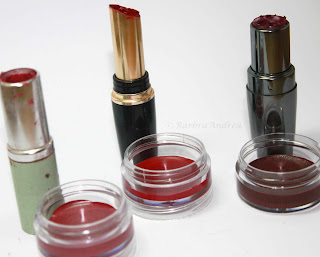
DIY: How to De-pot Lipsticks

So many lipsticks, yet so little space. Learn how to make room for all of your favourite lip candies by following 4 simple steps.


First things first! Here are the materials you're going to need:
      • A lipstick (of course!)
      • Toothpicks
      • A stainless spoon (something you won't miss, since you can't use it again)
      • A candle
      • Stackable glass container (where you'll put the melted lipstick)

Click to enlarge


Et voilĂ ! A more compact home for your lippies!


TIP: 
Take out the label from the bottom of the original lipstick tube and stick it to its' new glass container so if someone asks you what brand and shade you're wearing, you'd still know where to look for it.


I hope you find this DIY helpful. If you know more ways and techniques on how to de-pot lipsticks please so share it with me by commenting below.